Tag Archives: avocado

Carne Asada Street Tacos: Sous Vide or Grilled

5 Mar
Carne Asada Street Tacos

Carne Asada Street Tacos

I had a gorgeous hunk of flank steak in our freezer from our quarter cow we bought last year, and carne asada street tacos were calling my name! Typically skirt steak is used for these tacos, but I figured the leaner flank steak would work just as well provided it was marinated in a citrusy sauce for a spell.  I decided to cook this via the sous-vide method, but grilling the steak would work just as great.

Total thumbs up all the way around for the tacos! We had plenty of leftovers for another dinner even with my daughter eating three of them in one sitting. I made some fresh pico de gallo to serve these with along with the avocado, but you can use any condiments of choice for these tasty tacos.

Carne Asada Ingredients

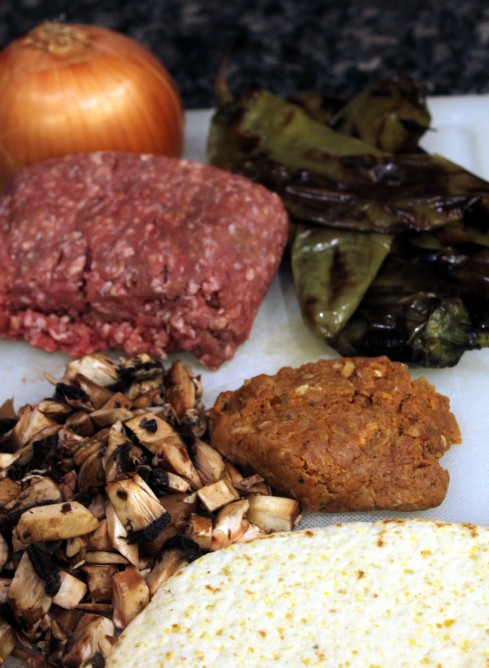
Many of the delicious Carne Asada ingredients

Carne Asada Street Tacos: Sous Vide or Grilled
Adapted from Serious Eats

3 whole dried ancho chiles, stems and seeds removed
3 whole dried guajillo chiles, stems and seeds removed
2 teaspoons ground cumin
1 teaspoon ground coriander
2 whole chipotle peppers, canned in adobo sauce
3/4 cup fresh juice from 2 to 3 oranges (I used Cara Cara)
2 tablespoons fresh juice from 2 to 3 limes
2 tablespoons extra-virgin olive oil
2 tablespoons soy sauce
2 tablespoons Asian fish sauce
6 medium cloves garlic, peeled
1 small bunch cilantro, leaves and tender stems only
2 tablespoons dark brown sugar
Sea salt, to taste
1.5 to 2 pounds flank or skirt steak
Warm corn or flour tortillas, lime wedges, diced onion, additional fresh cilantro (or Pico de Gallo), and avocado, for serving

Place dried ancho and guajillo chilies in a glass bowl and cover with boiling water. Let steep for 20 minutes until soft and pliable. Drain water, then transfer chiles to a food processor or blender.

Toasting the Cumin and Coriander

Toasting the Cumin and Coriander

Toast the ground cumin and coriander in a hot dry skillet until fragrant and add to the chiles. (You could toast the seeds and grind yourself, but I’m not that fancy.)

Ready to Process the Marinade

Ready to Process the Marinade

Add the rest of the ingredients except steak and condiments. Blend until a smooth sauce has formed. Transfer half of the sauce to a gallon-sized zip-top bag and refrigerate or freeze the other half in a sealed container for future use.

BONUS! Here’s my quick recipe for homemade Pico de Gallo. Double or triple as needed:

Pico de Gallo

1 Roma tomato, chopped
1/4 cup diced onion
1/2 jalapeño or serrano chile, finely diced
1/4 cup finely chopped fresh cilantro
1 teaspoon lime juice
Salt and pepper, to taste

Mix all the ingredients in a small bowl, and let marinate for an hour or so. That’s it!

For cooking via sous-vide method:

Add steak to the marinade in the bag, squishing around to coat.

Steak in Marinade

Steak in Marinade

Vacuum-seal the bag using the water immersion method. Set temperature on the sous vide to 131 F, then place the bag in the pot and cover with plastic wrap to prevent evaporation. Cook for 24 hours.

After 24 hours, preheat a cast-iron pan on high. Remove the bag from the sous-vide pot, then remove the steak from the marinade and wipe off excess. Discard marinade. Char the steak in the hot pan for a minute or two on each side until well-browned. Transfer to a cutting board and slice thinly against the grain.

Serve immediately with warmed tortillas and garnishes.

Sliced Carne Asada Flank Steak

Sliced Carne Asada Flank Steak

For cooking on a grill:

Add steak to the marinade in the bag, squishing around to coat. Squeeze the air out of the bag, seal, then refrigerate for at least 3 hours or up to overnight.

When ready to cook, preheat your grill on one side to the highest temperature. Clean and oil the grilling grate.

Remove steak from marinade and wipe off excess. Place directly over the hot side of the grill. If using a gas grill, cover; if using a charcoal grill, leave open. Cook, turning occasionally, until steak is well charred on outside and center registers 110°F on an instant-read thermometer, 5 to 10 minutes total. Transfer to a cutting board and allow to rest for 5 minutes. Slice thinly against the grain.

Serve immediately warmed tortillas and garnishes.


Download and Print this Recipe

Download and Print this Yummy Recipe!

Chorizo and Beef Enchiladas with Cheesy Hatch Chile Sauce

12 Mar
Chorizo and Beef Enchiladas with Cheesy Hatch Chile Sauce

Chorizo and Beef Enchiladas with Cheesy Hatch Chile Sauce

I had a hankering for Tex-Mex last weekend, and when I get a hankering for something there is no stopping me! Of course I wanted to use some of my roasted Hatch chiles and Mexican chorizo sausage from the freezer, and lots of ooey-gooey cheese.

The supermarket has started carrying “artisan-style” tortillas in a variety of flavors, so I picked up some whole wheat/corn blend in a “New Size!” I wonder what the old size was as I had never even seen them before. The new size turned out to be 8 inches, which made it tricky fitting them into my existing casserole dishes, and I wasn’t planning on making a huge batch for a 9 x 13 dish. Placing them length-wise in my 2-quart casserole did the trick!

Rolled Enchiladas

Rolled Enchiladas

I ended up with 5 rather large enchiladas, which was almost a perfect amount for the three of us.

One thing to note: These did not seem to reheat well the next day (too dry), so plan on adjusting the amounts or eating the entire dish! If I weren’t trying to cut my calorie intake recently I certainly could have eaten more than I did. I got thumbs up all the way around from the fam for this, and my hankering was well-satisfied. The flavors were just fantastic and the perfect blend of spices, chiles, and cheese.

Chorizo and Beef Enchiladas with Cheesy Hatch Chile Sauce

3/4 pound (12 ounces) ground beef
2 to 4 ounces Mexican chorizo
1 teaspoon oil
1 cup chopped onion
1 cup chopped mushrooms
3 roasted Hatch chiles, diced and divided (or 6-ounce can diced green chiles)
1 3/4 cups of low-salt beef or chicken broth, preferably homemade, divided
1/8 teaspoon smoked paprika
Sea salt and freshly ground black pepper, to taste
5 to 8 corn and/or flour tortillas
Vegetable oil, as needed for tortillas
3 tablespoons butter
3 tablespoons flour
1/2 cup sour cream
2 cups grated Monterey Jack cheese
Sliced avocado and cilantro, for garnish

Enchilada Ingredients

Enchilada Ingredients

Preheat oven to 350 degrees.

In a skillet over medium heat, add the ground beef and Mexican chorizo and brown.

Sausage, Beef and Veggie Mixture

Sausage, Beef and Veggie Mixture

Add the mushrooms, onions and chile peppers into the mixture. Add the smoked paprika, then salt and black pepper to taste. Cook for about 5 more minutes, then add 1/2 cup of broth. Simmer for a minute or two more until the broth reduces, but don’t let the mixture dry out. Turn off heat and set aside.

Heating a Tortilla

Heating a Tortilla

In a cast iron or other skillet, heat up a small amount of oil over medium-high heat. One at a time, heat each side of a tortilla until pliable and just starting to brown. Don’t overcook or the tortilla will be difficult to roll. Place on paper towels to drain. Repeat with remaining tortillas, adding a small amount of oil as necessary.

Filling a Tortilla

Filling a Tortilla

Spoon the meat mixture into a tortilla, then roll up, placing seam-side-down in the in a lightly oil-sprayed casserole dish. Repeat until mixture is gone.

Melting Butter in Same Skillet

Melting Butter in Same Skillet

In the same skillet the meat mixture was in, melt the butter over medium heat. You don’t need to wipe out the pan first. Sprinkle the flour over the melted butter, whisking continuously until the mixture is light golden brown.

Chiles in White Sauce

Chiles in White Sauce

Add the remaining broth and whisk until starting to thicken. Add the rest of the chopped green chiles, stirring to incorporate.

Adding the Cheese to the Chile Sauce

Adding the Cheese to the Chile Sauce

Reduce the heat and mix in the sour cream, then add the cheese to the sauce. Stir until combined and melted.

Cheesy Enchiladas Ready to Bake

Cheesy Enchiladas Ready to Bake

Pour the sauce evenly over the rolled tortillas.

Bake the enchiladas at 350 for 20 to 25 minutes, until bubbling. Remove and let sit for 5 to 10 minutes. Serve enchiladas garnished with avocado and cilantro.

Garnished Enchiladas

Garnished Enchiladas


Download and Print this Recipe

Download and Print this Yummy Recipe!


Southwest Taco Salad with Creamy Guacamole Dressing

7 Sep
Southwest Taco Salad with Guacamole Dressing

Southwest Taco Salad with Creamy Guacamole Dressing

Ahhh, where oh where did the summer go? School starts this week in my neck of the woods and temperatures have gone from sizzling hot to almost frosty. But that shouldn’t stop anyone from enjoying this zesty and crunchy salad filled with summer bounty topped with a smooth avocado dressing.

We’ve just returned this weekend from nine glorious days camping and fishing at the beautiful Oregon coast. What a wonderful way to end the summer!

Southwest Taco Salad with Creamy Guacamole Dressing
Adapted from Southwest Salad with Creamy Avocado Salsa Dressing at Carlsbad Cravings

Creamy Guacamole Dressing

1 small avocado, peeled and roughly diced
1 small jalapeño, seeded, deveined, and roughly chopped
1/4 cup cilantro
1/4 cup plain Greek yogurt
1/4 salsa, homemade or store-bought (I used my Hatch chile salsa)
1/2 cup milk
2 tablespoons olive oil
Juice from 1 lime
Salt and pepper, to taste
1/4 teaspoon cumin

Southwest Taco Salad

Grilled chicken breast, sliced (or deli rotisserie)
Corn kernels from 1 ear of sweet white corn
Chopped/shredded lettuce of choice
1 red bell pepper, chopped
1/2 large red onion, chopped
1 cup cherry tomatoes, cut in half
1 15-ounce can black beans, rinsed and drained
1/3 cup roasted pepitas
1/2 cup grated pepper jack cheese
Creamy Guacamole Dressing
Tortilla chips, for serving

Creamy Guacamole Dressing

Creamy Guacamole Dressing

Add all of the Creamy Guacamole Dressing ingredients to a blender or food processor and blend until smooth and creamy. You will have to scrape down the sides a few times. Add additional milk, if needed, to thin to desired consistency. Chill in the refrigerator until ready to use.

Next, grill the chicken breast, if it isn’t already cooked.

Grilled Chicken

Grilled Chicken

Remove the kernels from the ear of corn, using a Bundt-pan to catch the kernels, if you have one. (That’s a pretty cool tip I picked up from Pinterest.)

Cutting the Corn off the Cob

Cutting the Corn off the Cob

Add all the salad ingredients except dressing and chips to a large bowl. Toss to combine.

Southwest Taco Salad Ingredients

Southwest Taco Salad Ingredients

Add tossed salad to individual bowls, then top with guacamole dressing and serve with tortilla chips.

Download and Print this Recipe

Download and Print this  Yummy Recipe!


Grilled Nachos with Chicken and Chunky Guacamole plus Grilled Mexican Tortilla Pizza

15 Jul
Chunky Guacamole Grilled Nachos with Chicken

Chunky Guacamole Grilled Nachos with Chicken

It’s about time I had a new recipe, yes? Since I’m off camping (once again) this weekend, I’m posting mid-week so as not to leave you empty-handed. This time we are going to Clear Lake for an annual reunion to celebrate my uncle’s (dad’s side) birthday. This will be his 88th! Happy Birthday Uncle Joe!

Although we’ve cooled down the past few days, last week it was sweltering hot after we got back from our river camping trip. And when it’s that hot, I always fire up the grill for dinner. I thought some loaded chicken nachos sounded pretty darn good. I was going to grill the chicken, but decided instead to throw it in the crockpot with the seasonings then plug in the appliance outdoors on the deck. And then I shredded the chicken when it was done, mixed up some chunky guacamole made with a serrano pepper from my garden, assembled the nachos then slapped them on the grill! (OK I slid them, not slapped.) 😀

Serrano Pepper Plant

My Serrano Pepper Plant is Producing Awesomely!

This was a plenty filling dinner out on our deck on the patio table. I had leftover shredded chicken, black beans, and sliced olives so decided to make a Grilled Mexican Tortilla Pizza the next night. Hey you get several recipes this time! Olé!

Crockpot Taco Chicken

Crockpot Taco Chicken

Chunky Guacamole Grilled Nachos with Chicken

For the chicken:

1 large boneless, skinless chicken breast
1 tablespoon taco seasoning mix (recipe here, or store-bought)
1 cup chicken broth
1/2 lime, squeezed

Guacamole Ingredients

Guacamole Ingredients

For the chunky guacamole:

2 medium avocados, peeled, pitted and chopped
1 medium Roma tomato, deseeded and chopped
1 serrano pepper, stem cut and deseeded and finely minced
1/4 cup chopped onion
1 tablespoon cilantro
Sea salt and ground black pepper, to taste

For the nachos:

Tortilla chips
Grated block cheddar cheese (it melts better than pre-shredded)
Shredded chicken
More grated cheese
Canned black beans, rinsed and drained
Sliced black olives, drained
Chunky guacamole (recipe below)
Sour cream
Fire-roasted salsa (recipe here, or store-bought)
Chopped green onion

Shredded Chicken

Shredded Chicken

Add the chicken ingredients to a crockpot and cook on high for 4 hours. Remove chicken and shred, then set aside.

Guacamole Ready to Smash

Guacamole Ready to Smash

Meanwhile, prepare the chunky guacamole. Add all the prepped ingredients to a bowl, then smash up and mix with a fork until desired consistency. Cover with plastic wrap then refrigerate.

Chunky Guacamole

Chunky Guacamole

Preheat the grill to high heat on one side. Line a large baking sheet with foil, then layer tortilla chips in one layer on the foil. Spread with grated cheese, then chicken, then more cheese, black beans, and black olives.

Preparing the Nachos

Preparing the Nachos

Slide the foil sheet onto the heated side of the grill then cover, grilling for about 10 minutes until the bottoms of the chips are crispy. Move the nachos to the unheated side of the grill then cover again, grilling until the cheese has melted.

Grilling the Nachos

Grilling the Nachos

Slide nachos back onto the baking sheet, top with chunky guacamole, sour cream, salsa, and chopped green onion to taste. Enjoy!

Now here is a recipe for what to make with any leftover ingredients you have from the nachos, depending on the size of your family or if your teenage daughter decides she’s going to a friend’s house for dinner instead of eating your excellent nachos. Just a couple of photos with this one and paper plates, it was that kind of night!

Grilled Mexican Tortilla Pizza

10-inch flour tortillas
Oil spray
Canned black beans, rinsed and drained
2 teaspoons olive oil
Fire-roasted salsa (recipe here, or store-bought)
Cooked shredded chicken (use deli rotisserie chicken or leftovers)
Sliced black olives, drained
Thinly sliced onion
Jarred sliced jalapeños
Grated Colby Jack cheese

First add the black beans to a blender or food processor, then drizzle in olive oil and process until creamy, scraping down the sides and adding oil as needed. Set aside.

Prepping the Mexican Pizza

Prepping the Mexican Pizza

Preheat the grill to medium to medium-low, and spray the tortilla(s) on one side and grill for about 3 minutes, until crisp and starting to puff up on the top side. Remove to plate, then spray the non-grilled side with oil. Flip over, then spread the creamy beans evenly over the tortilla. Top evenly with salsa, shredded chicken, black olives, onion, jalapeños and cheese.

Grilling the Mexican Tortilla Pizza

Grilling the Mexican Tortilla Pizza

Place back on grill, cover, and cook for about 5 more minutes until cheese is melted. You might need to move it to the unheated side if it’s getting too crispy on the bottom and the cheese isn’t melted yet. Add a green salad on the side, and dinner is served!

Download and Print this Recipe

Download and Print this Yummy Recipe!


Spicy Canned Tuna Ceviche

7 Jun
Spicy Canned Tuna Ceviche

Spicy Canned Tuna Ceviche

I planned on making this for my Saturday lunch, but all sorts of errands got in the way. After a two and a half hour shopping binge trip at three stores, it was time to pick up my 16-year-old daughter from her 4-hour SkidCar course at noon (which I begrudgingly got up at 7:30 am on a weekend to take her to it). I had bought all the ingredients for this recipe, in addition to restocking our refrigerator with staples. Our freezer in the fridge went KAPUT a couple of weeks ago, and then the refrigerator side slowly went downhill until it barely kept milk cold enough to drink. We’d been “cooler camping” at our house for the last few days until our new fridge arrived and had to toss out a bunch of stuff. Thank goodness we have a chest freezer in the garage, as I would have been heartbroken to lose the rest of our quarter cow we bought last fall. Nonetheless, after all that shopping I didn’t have time to make this, let alone get the groceries out of the car before I had to pick her up! So we stopped at a local fresh Mexican food joint on the way home and I had a taco and she had a burrito.

For dinner last night, I made my staple summer-time grilled tortilla pizza! I marinated then grilled the chicken, tossed the tortilla on the grill, added pesto, artichoke hearts, the chicken, mozzarella and fresh basil from my herb garden.

Fresh Basil in Herb Garden

Fresh Basil in Herb Garden

I made this and other tortillas pizzas all last summer. If you want the recipes, click here —> Grilled Tortilla Pizzas.

Fresh Grilled Chicken, Artichoke and Pesto, Tortilla Pizza

Fresh Grilled Chicken, Artichoke and Pesto Tortilla Pizza

p.s. You are asking yourself, what is a SkidCar course? It’s an amazing driving course using a special car and hydraulics to teach someone how to drive on ice and snow (or how to get out of a skid on any surface), even if there is no snow on the ground! My daughter will get a 30% discount on insurance now, we checked with our company. Win-win, and I’ll feel more secure now when the snow flies again in the winter with her driving skills. I arrived about 5 minutes early and got to see my daughter go into several “skids” and safely recover from them! For information on that course (not available in all areas) click here —> SkidCar course).

And yes, I made this great lunch today, finally. It was every bit as delicious as I expected it to be, and my husband said he really like it a lot! Now on to the recipe!

Spicy Canned Tuna Ceviche
Credit for this goes to Gina for Canned Tuna Ceviche at Skinnytaste.com

2 tablespoons minced red onion
1 to 1 1/2 limes, juiced (about 1/8 cup)
1 teaspoon olive oil
1 can chunk white albacore tuna packed in water, drained
2 tablespoons chopped fresh cilantro (or parsley)
1/2 to 1 jalapeño, deseeded and minced
1 medium seeded plum tomato, finely diced
Dash of Sriracha sauce (optional)
Sea salt and freshly ground black pepper, to taste
Romaine lettuce leaves, for serving
Sliced avocado, for garnish
Tortilla chips, for garnish

Fresh Ceviche Ingredients

Fresh Ceviche Ingredients

In a medium bowl, combine the red onion, lime juice, and olive oil. To that, add the tuna, cilantro, jalapeño, tomato, and Sriracha, if using. Taste and add salt, pepper, and more lime juice, if needed.

Ceviche Ready to Chill

Ceviche Ready to Chill

Gosh I’m a messy cook! Cover and refrigerate for a minimum of 20 minutes. Serve on a bed of romaine lettuce leaves garnished with slices of avocado and tortilla chips. A wonderful light summer lunch salad!

Spicy Canned Tuna Ceviche

Spicy Canned Tuna Ceviche

Download and Print this Recipe

Download and Print this Yummy Recipe!

Chicken Chile Verde Posole

18 Jan
Chicken Chile Verde Posole

Chicken Chile Verde Posole

This is the second pressure-cooker recipe I made in one week, although you can certainly cook this over the stove in a Dutch oven. This was a very satisfying, quick and easy meal on a cold winter’s night! There are a lot of great flavors going on in this. I had an unexpected guest the next night, and he practically inhaled the rest of the leftovers!

Chicken Chile Verde Posole

1 tablespoon olive oil
2 cloves garlic, peeled and rough-chopped
1 cup rough-chopped onion
1/2 teaspoon dried ground cumin
1/2 teaspoon dried, crushed Mexican oregano
1 pound boneless skinless chicken breast(s)
1 to 2 cups canned hominy, rinsed and drained
1 can black beans, rinsed and drained
2 7-ounce cans Salsa Verde (I used Herdez)
1 to 1/2 cups homemade or low sodium chicken broth
Ground black pepper, to taste
Handful of chopped cilantro leaves
Avocado, lime slices, and additional cilantro, for garnish

Onions, Garlic, and Spices

Onions, Garlic, and Spices

Sweat the onions and garlic with the oil in the pressure cooker over medium-high heat, then add the spices.

The Rest of the Ingredients

The Rest of the Ingredients

Add the rest of the ingredients, cover with the cooker lid, and bring up to pressure. Cook 5 minutes rocking under pressure, then release naturally. Shred the chicken in the pot with two forks. Serve in a bowl with garnishes.

Cooked Chicken Posole

Cooked Chicken Posole ~ with another handful of chopped cilantro for good measure

Note: If using a Dutch oven, cut the chicken into bite size pieces and brown with the onions and garlic. Then add the rest of ingredients and simmer for 15 to 30 minutes to let the flavors meld.

Download and Print this Recipe

Download and Print this Yummy Recipe!

Spicy Grilled Chicken Tacos

3 Jul
Chicken Fajita Taco

Chicken Fajita Taco

Happy 4th of July! If you are planning on grilling over this festive holiday week, why not include some yummy chicken tacos in the line-up? We’ve had some record-breaking sizzling heat here in Central Oregon, and grilling has been the standard.

I whipped up a small batch of Chicken Fajitas the other night, recipe here: Chicken Fajita Marinade. After a quick 10 minutes on the grill, we sliced up the meat, and added black beans, onions, avocado, Cotijo cheese, and cilantro on flour tortillas and chowed on dinner in no time.

Grilled Chicken Taco

Grilled Chicken Taco

We are once again off to our RV property for the rest of the week, where it will be a pleasant 70 degrees. I hope you all have a safe and enjoyable holiday week!

Grilled Steak Salad with Roasted Tomato Salsa and Cotija Cheese

5 Jun
Spicy Grilled Steak Salad with Roasted Tomato Salsa and Cotija Cheese

Spicy Grilled Steak Salad with Roasted Tomato Salsa and Cotija Cheese

I went twice — mind you TWICE — to my local store that caters to the Hispanic community each day this past weekend to find flank steak for this salad, and both times they said they had sold out already! I obviously need to get to the store earlier in the day if I want that cut of meat.

Nonetheless, I didn’t want to travel to another grocery so I settled on super-thin cut bottom round, which was labeled “for Carne Asada” so figured that would work just fine. I was planning on marinating the meat anyways in a lime juice concoction, which helps tenderize the meat. The idea to make steak salad started with wanting to use up the rest of my Roasted Tomato Salsa  from the other day. It’s been in the high 70s/low 80s  here the past few days and just love to grill in this kind of weather.

Beef Marinating in Chile Lime Sauce

Beef Marinating in Chile Lime Sauce

There are so many things you can do with a salad like this! Some grilled corn would be great on it,  but it’s not quite yet corn season here yet, but settled on adding avocado, black beans seasoned with cumin and some of the salsa and lime juice, halved grape tomatoes, grilled red and yellow peppers, green onion, and black olives. Oh! And the finishing touches of my Roasted Tomato Salsa, crumbled Cotija cheese, cilantro, and tortilla chips.

Fresh Red Leaf Lettuce and Baby Spinach

Fresh Red Leaf Lettuce and Baby Spinach

This was the first time I’d ever bought Cotija cheese, but had seen it used in many Mexican recipes. It’s a brick of cheese that crumbles up like blue cheese, and my first taste realized why it goes so well with Mexican cooking! Such a fabulous “tang” to it! From what I researched it keeps really well too, so my somewhat spendy purchase for 10 ounces of it should keep in the fridge for quite a while and am looking forward to using it in other dishes.

Steak Marinade

1/4 cup olive oil
1/4 cup fresh-squeezed lime juice
1 tablespoon white wine vinegar or regular vinegar
1 tablespoon minced garlic
1/2 teaspoon cumin
1/2 teaspoon New Mexico Red or Ancho Chile powder
1 teaspoon baking soda
Black pepper to taste
1/2 cup chopped fresh cilantro
1 pound thin-sliced bottom or top round steak (or flank steak if you can find it!)

Whisk all the ingredients except the steak in a medium glass bowl.  Add the thinly sliced steak and let marinate in the refrigerator for a minimum of 1 hour but up to 3 or 4 hours. Mix around when you can. A half hour before cooking, remove from the fridge and let set to come to room temperature.

Zesty Grilled Southwest Steak Salad

Zesty Grilled Southwest Steak Salad

Grilled Steak Salad with Roasted Tomato Salsa and Cotija Cheese

1 bell pepper (we used 1/2 red and 1/2 yellow), deseeded and halved
Spray olive oil
Garlic powder
Marinated steak (recipe above)
1 can black beans, rinsed and drained and seasoned with 1 tablespoon salsa, squeeze of lime wedge,  and 1/2 teaspoon cumin
1 cup of mixed greens per person (we used red leaf lettuce and baby spinach)
1 6-ounce can black olives
3 green onions, chopped roughly
1/2 carton grape tomatoes, halved
1 avocado, peeled and sliced
Roasted Tomato Salsa recipe, for dressing, or any salsa you have on hand
Crumbled Cotija cheese, for garnish
Cilantro, for garnish
Corn tortilla chips, for garnish

Preheat grill to high, spray the bell pepper with olive oil both sides and sprinkle with garlic powder.  Place on grill 20 minutes before ready to assemble the salad.  Meanwhile, mix up the black beans, salsa, lime,  and cumin, and set aside. After 10 minutes flip the peppers over. Now place the thin-sliced marinated steak on the grill and cook each side 3 to 4 minutes, then remove and tent with foil. Remove the peppers from the grill and slice  thin.

Now take the steak and slice thin across the grain. Add your greens to a bowl, assemble the vegetables over it (don’t forget anything, that’s easy to do!), then top with the steak. Add the Roasted Tomato Salsa for dressing, then the cheese, cilantro, and tortilla chips for garnish. This is a great dish to mix and combine any number of fresh vegetables you may have on hand. Olé!

Creamy Poblano Tortilla Soup with Chicken and Hominy

23 Jan
Creamy Poblano Tortilla Soup with Chicken and Hominy

Creamy Poblano Tortilla Soup with Chicken and Hominy

Well I preempted a post about my husband’s amazing spicy beans and rice dish for this crazy good soup I made. As you may already know, I’m on a soup kick lately, which I do in spurts. This soup has such amazing textures and flavors that I felt compelled to share it next instead. Somehow I ended up finding a creamy Poblano soup recipe while surfing the net well over a week ago for who knows what, I don’t even remember now. So on my next grocery trip, I bought a Poblano (also known as a Pasilla) pepper for it, then threw in a Serrano pepper into the bag for good measure that day. Then the week dragged on, we ate a variety of meals, then I discovered the peppers hidden under the lettuce in the veggie drawer almost a week later. GASP! I was so worried they were expired. But the foodie spirits were with me and they were still nice and crisp and fresh and ready to use. I had to go back in my browser history to find the dang recipe, as all the keywords I used in my search to find it again didn’t bring it up. Whew, I found it! The recipe came from a defunct restaurant on a website that hasn’t been updated in several years, but I ended up finding several variations of the recipe on other sites. So now I present you my take on this.

What makes this soup so interesting is the method to achieve the creaminess. You grind up corn tortillas in a food processor or blender with some spices and flour, then use that to make a roux. This roux then makes the creamy base for the soup along with chicken broth, with a tad of sour cream thrown in at the end. So you get an incredibly creamy soup but with the corn tortilla taste instead of the blander all-flour taste. One of the recipes called for adding corn “cobettes,” but I added yellow hominy instead. It’s all corn. I made this twice as difficult to make because I cooked the chicken for the soup from scratch, which then made the chicken broth for the soup. As always, feel free to substitute canned or boxed low-sodium chicken broth and some leftover or rotisserie chicken to save yourself the time in the kitchen. But I really enjoy making chicken broth from scratch (even though I have still have about 6 quarts of turkey and chicken broth in the freezer!).

Poblano, Serrano, Onion, Avocado, and Ground Tortilla Mix

Poblano, Serrano, Onion, Avocado, and Ground Tortilla Mix

As a side note, when I was de-seeding and chopping up the Serrano pepper (with latex gloves, yes!), my eyes started watering and I literally started choking. Yowza! That was one hot pepper, I could tell! So I only used 1/4 of the pepper instead of the whole one I was planning on. Good call, me-thinks. You can omit the Serrano altogether, too, if your family doesn’t like too spicy. In the end, my daughter inhaled the soup (but no it wasn’t a seconds or thirds soup for her) and my hubby said he really liked the flavors, but got confused by the textures. He asked if there were dumplings in it. (That was the hominy.) Sigh. But MY rating is  four-star plus!

Creamy Poblano Tortilla Soup with Chicken and Hominy

3 white or yellow corn tortillas (6-inch)
2 tablespoons flour
1/2 teaspoon Ancho (aka Dried Pasilla) chili powder or regular
1 teaspoon ground cumin
Lots of ground pepper to taste
2 tablespoons vegetable oil
1/2 medium onion, chopped
1 Poblano (or Pasilla) pepper, chopped
1/4 to 1 Serrano pepper, finely diced (or omit)
1 teaspoon minced garlic
3 tablespoons butter or substitute
4 cups homemade chicken or turkey broth, or low sodium subbed
1 cup yellow or white canned hominy, rinsed and drained (freeze the rest)
1/4 cup sour cream
1 1/2  to 2 cups cooked chicken, cut bite-sized
Shredded Monterrey Jack cheese
Fresh diced avocado

Start out by slicing up the tortillas into manageable chunks for your food processor or blender. Add those to your device then add in the chili powder, cumin and ground pepper. I only have a blender, so it was a bit trickier. I used the “pulse” mode, and pulsed all that a few times, then had to scrape it down, then kept pulsing and repeating the scraping until it was the texture of a coarse cornmeal, as shown in photo below.

Spicy Ground Tortillas and Flour Mixture

Spicy Ground Tortillas and Flour Mixture

In a deep-dish cast iron skillet (or sturdy dutch oven or soup pot) heat the oil over medium-high heat and add the chopped onion, Poblano, and Serrano peppers. Cook for just a few minutes then turn down to medium heat, add the minced garlic, and stir for a total of about another 8 minutes, until the onion is translucent. Now add the  butter, let it melt, then add that cormeal-ish flour mixture to the pan and stir and mix and smoosh down like crazy for the next 5 minutes or so, to form the “roux.” The main thing is to keep stirring constantly and mixing around so nothing burns in there.

Making Corn Tortilla Roux

Making Corn Tortilla Roux

At this point, verra slowly, and I mean slowly, start drizzling in the chicken broth while you whisk and stir. Just keep adding it slowly until about half of it has been added and totally mixed in smoothly. Once that is done, you can now add the rest of the broth then crank up the heat to bring to a boil. Once it’s boiling, turn down to a simmer then add the hominy and cook for about 10 more minutes, stirring occasionally.  Last, mix in the sour cream, bring up to a simmer again, then cook for another 10 minutes but don’t let it come to a boil again. Well, that’s it! Ladle into bowls and serve with chopped avocado and shredded cheese. Yowza that was good! I can say Yowza twice in my post, right? OK make that three times. I hope you enjoy this!

p.s. This is my first post using my new camera skills! No flash, no ucky yellow tone from overhead lightbulb. I’m enjoying my camera again!

Introducing the Huevodilla

20 Oct
Huevodilla

Huevodilla

Every once in awhile I discover a new recipe that truly inspires me. When I came across this delight from The Pioneer Woman, I thought, “Now why didn’t I think of that before?” And the next thought that popped into my mind was “Cheese!” The corn tortillas just screamed out for cheese to me. So with a little adaptation, I turned a really good idea into a fantastic, filling, crazy-good plate of awesomeness. Can you tell I am just a little excited to share this with you? Ree Drummond (aka The Pioneer Woman) called her version “Heuvo in the Hole.” I coined the term Huevodilla for mine, which if I’m not mistaken probably translates to “little egg” in Spanish, but it’s my way of combining Huevo and Quesadilla.

Unlike Ree, I do not own a biscuit cutter to cut the holes in the center of the tortillas. Instead I used a small jelly jar to use as a guide to cut the holes with a paring knife. Not quite as pretty, but it did the job. I only had white corn tortillas instead of yellow too, but I’m sure that did not make much difference in the taste.  My only regret with this recipe is I didn’t have any cilantro on hand, but the addition of avocado rounded out this gem.

Stacking the Tortillas and Cheese

Stacking the Tortillas and Cheese

Huevodilla

3 small corn tortillas
Spray oil
Shredded cheese, any kind
Black pepper, to taste
1 egg
Sliced avocado
Salsa
Sour cream
Cilantro (if you have it!)

Cut a circle  out of the center of the each tortilla.  Spray each of the tortillas lightly with oil. Heat a griddle or skillet to medium heat and spray with a little more oil. (You may use butter here instead if you want.) Place one tortilla on the griddle. Carefully spread the shredded cheese on top of the tortilla. Place the next tortilla on top of that and add the cheese. Finally, add the third tortilla to the top. By this time, the bottom cheese should have started to melt enough to stick to the tortilla, so press down a bit with a spatula to stick it all together. Crack the egg into the middle of the tortillas, then grind some black pepper over the egg. Let the egg cook until the white has set enough to flip over. Spray just a tad more oil to the top of the egg, then carefully flip the concoction over. Continue cooking until the egg is done to your liking. Slide onto a plate, and serve with avocado, salsa, sour cream, and cilantro. Dig in!

Here is a link  Ree’s recipe if you want to take a gander at the original: http://thepioneerwoman.com/cooking/2012/07/huevo-in-the-hole/

Huevodilla Up Close and Personal

Huevodilla Up Close and Personal