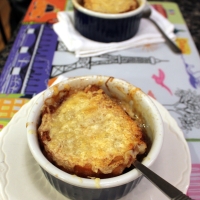
Tag Archives: monterrey jack cheese

Tex-Mex Enchiladas

22 Oct
Tex-Mex Enchiladas

Tex-Mex Enchiladas

It’s been a gloomy, rainy, and WINDY few days here on the high desert, and my taste buds wanted comfort food. And when you’re a Texas gal like me, sometimes that translates into Tex-Mex. I had some leftover shredded carne asada beef in the freezer, and of course the obligatory package of dried ancho chiles in the pantry. (What, you don’t keep those hanging around, just in case??) So of course, enchiladas are on the menu!

My Texas buddy Adam provided the inspiration for these, because Adam is connoisseur of all food Tex-Mex. No really, he is! I grabbed this recipe out of his archives, because a good enchilada sauce is timeless. Do yourself a favor and read his post about it, you might be enlightened!

Tex-Mex Enchiladas
Adapted from Joe Gracey’s Tex-Mex Enchiladas, via The Unorthodox Epicure

2 cups homemade chicken broth, or water
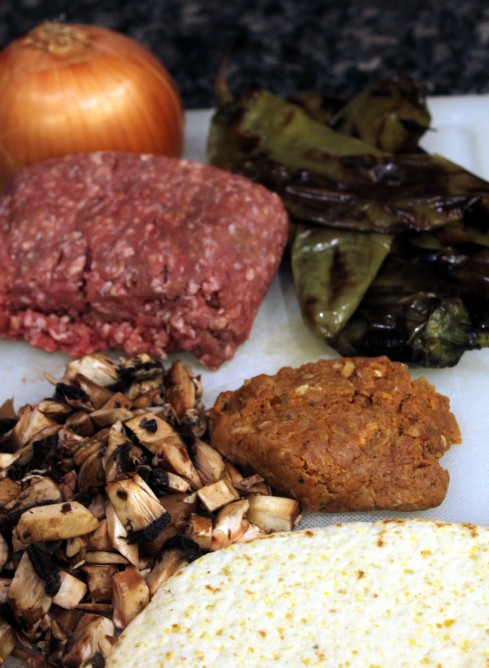
3 large dried ancho chiles
1 tablespoon oil
1 medium onion, chopped (reserve 1/2 cup)
2 cloves garlic, minced
2 teaspoons cumin
1 tablespoon dried oregano
Ground black pepper, and salt, to taste
1 tablespoon honey, if needed
2 tablespoons flour
2 tablespoons vegetable oil
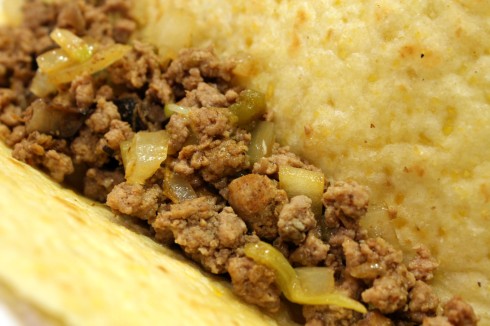
12 corn tortillas
3 cups grated Monterrey Jack cheese
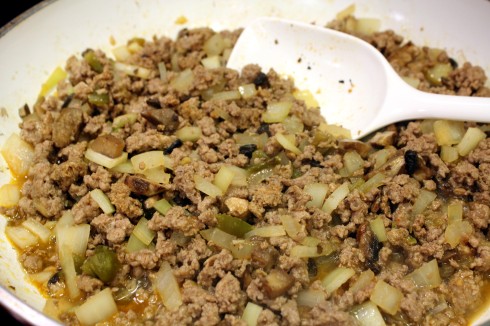
3 cups shredded cooked meat, heated through (can be beef, chicken, pork, whatever you have!)
Chopped cilantro, for garnish
Sour cream, for topping

Tear the tops off the ancho chiles and remove as many seeds as possible. Place the chiles in a sauce pan of simmering chicken broth until rehydrated and soft, about 10 minutes. Meanwhile, sauté the onion in a large skillet with a tablespoon of oil until softened.  Add the garlic in the last couple minutes.

Remove the chiles when softened, reserving the liquid. Add them to a food processor or blender along with the cooked onions and garlic and blend to a purée.

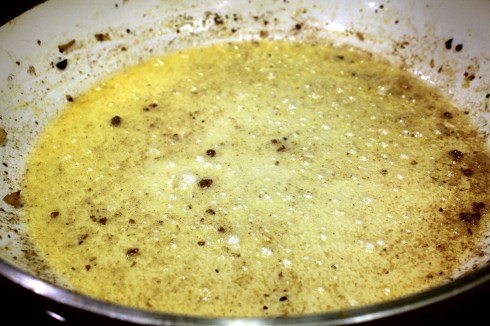
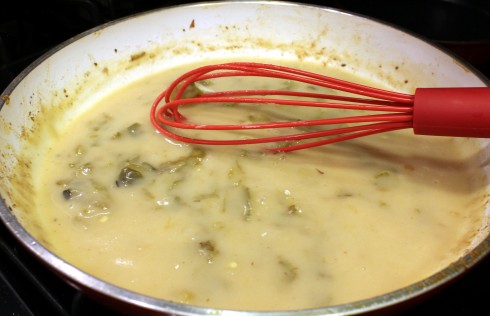
In the same skillet, stir in 2 tablespoons of oil and 2 tablespoons flour and cook until starting to turn golden brown. Pour the chile purée into the skillet, along with the reserved chile liquid. Stir in the cumin, oregano, and salt and pepper. Sometimes the ancho chiles can be bitter (haven’t figured out why yet) so add a tablespoon of honey and a bit more salt to mellow it out, if needed. Bring to a simmer and then cook on low for about 30 minutes. Add additional water if it gets too thick.

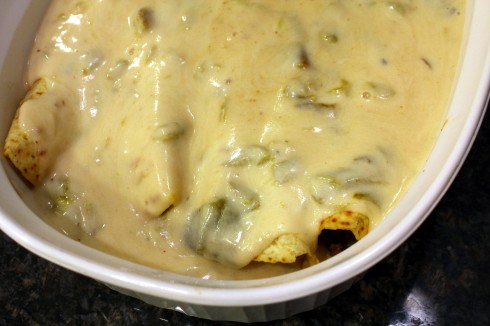
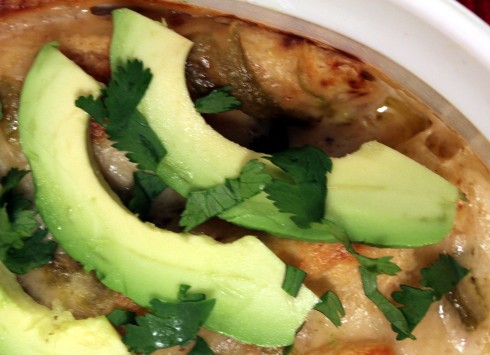
When ready to assemble: Preheat oven to 400 degrees. Using tongs, dip a tortilla into the enchilada sauce on both sides, then place on a plate. Top with 2 tablespoons cheese and 2 tablespoons of meat, roll up and place seam side down in a greased baking dish. Repeat until baking dish is full. Pour the remaining sauce over the enchiladas and top with the remaining grated cheese along with the reserved onion. Heat in the oven for 10 minutes until cheese is melted and dish is bubbling. Remove and top with cilantro and offer sour cream on top, if you want. Serve with pinto beans and Mexican rice.

Download and Print this Yummy Recipe!

Chorizo and Beef Enchiladas with Cheesy Hatch Chile Sauce

12 Mar
Chorizo and Beef Enchiladas with Cheesy Hatch Chile Sauce

Chorizo and Beef Enchiladas with Cheesy Hatch Chile Sauce

I had a hankering for Tex-Mex last weekend, and when I get a hankering for something there is no stopping me! Of course I wanted to use some of my roasted Hatch chiles and Mexican chorizo sausage from the freezer, and lots of ooey-gooey cheese.

The supermarket has started carrying “artisan-style” tortillas in a variety of flavors, so I picked up some whole wheat/corn blend in a “New Size!” I wonder what the old size was as I had never even seen them before. The new size turned out to be 8 inches, which made it tricky fitting them into my existing casserole dishes, and I wasn’t planning on making a huge batch for a 9 x 13 dish. Placing them length-wise in my 2-quart casserole did the trick!

Rolled Enchiladas

Rolled Enchiladas

I ended up with 5 rather large enchiladas, which was almost a perfect amount for the three of us.

One thing to note: These did not seem to reheat well the next day (too dry), so plan on adjusting the amounts or eating the entire dish! If I weren’t trying to cut my calorie intake recently I certainly could have eaten more than I did. I got thumbs up all the way around from the fam for this, and my hankering was well-satisfied. The flavors were just fantastic and the perfect blend of spices, chiles, and cheese.

Chorizo and Beef Enchiladas with Cheesy Hatch Chile Sauce

3/4 pound (12 ounces) ground beef
2 to 4 ounces Mexican chorizo
1 teaspoon oil
1 cup chopped onion
1 cup chopped mushrooms
3 roasted Hatch chiles, diced and divided (or 6-ounce can diced green chiles)
1 3/4 cups of low-salt beef or chicken broth, preferably homemade, divided
1/8 teaspoon smoked paprika
Sea salt and freshly ground black pepper, to taste
5 to 8 corn and/or flour tortillas
Vegetable oil, as needed for tortillas
3 tablespoons butter
3 tablespoons flour
1/2 cup sour cream
2 cups grated Monterey Jack cheese
Sliced avocado and cilantro, for garnish

Enchilada Ingredients

Enchilada Ingredients

Preheat oven to 350 degrees.

In a skillet over medium heat, add the ground beef and Mexican chorizo and brown.

Sausage, Beef and Veggie Mixture

Sausage, Beef and Veggie Mixture

Add the mushrooms, onions and chile peppers into the mixture. Add the smoked paprika, then salt and black pepper to taste. Cook for about 5 more minutes, then add 1/2 cup of broth. Simmer for a minute or two more until the broth reduces, but don’t let the mixture dry out. Turn off heat and set aside.

Heating a Tortilla

Heating a Tortilla

In a cast iron or other skillet, heat up a small amount of oil over medium-high heat. One at a time, heat each side of a tortilla until pliable and just starting to brown. Don’t overcook or the tortilla will be difficult to roll. Place on paper towels to drain. Repeat with remaining tortillas, adding a small amount of oil as necessary.

Filling a Tortilla

Filling a Tortilla

Spoon the meat mixture into a tortilla, then roll up, placing seam-side-down in the in a lightly oil-sprayed casserole dish. Repeat until mixture is gone.

Melting Butter in Same Skillet

Melting Butter in Same Skillet

In the same skillet the meat mixture was in, melt the butter over medium heat. You don’t need to wipe out the pan first. Sprinkle the flour over the melted butter, whisking continuously until the mixture is light golden brown.

Chiles in White Sauce

Chiles in White Sauce

Add the remaining broth and whisk until starting to thicken. Add the rest of the chopped green chiles, stirring to incorporate.

Adding the Cheese to the Chile Sauce

Adding the Cheese to the Chile Sauce

Reduce the heat and mix in the sour cream, then add the cheese to the sauce. Stir until combined and melted.

Cheesy Enchiladas Ready to Bake

Cheesy Enchiladas Ready to Bake

Pour the sauce evenly over the rolled tortillas.

Bake the enchiladas at 350 for 20 to 25 minutes, until bubbling. Remove and let sit for 5 to 10 minutes. Serve enchiladas garnished with avocado and cilantro.

Garnished Enchiladas

Garnished Enchiladas


Download and Print this Recipe

Download and Print this Yummy Recipe!


Summertime Heat Grilled Burger Sliders and Fries Meal

8 Jul
Grilled Burger Sliders and Fries Meal

Grilled Burger Sliders and Fries Meal

The heat has finally amped up in Central Oregon, and being in the mid-90s with no A/C means salads and outdoor grilling and cooking! Last night we had chef’s salad out on the back deck. The night before, more grilled tortilla pizzas with pepperoni, mushrooms, black olives and onions. (See, I told you we would be eating those grilled tortilla pizzas all summer!)

Tonight, my husband made this meal in its entirety, so I take no claim to it, but seeing as I haven’t posted a new recipe in awhile I decided to share with you.

If you have some hot days on the horizon, this is a great meal choice. And I just love King’s Hawaiian rolls as a slider bun choice. They are so moist, ever so slightly sweet, but still hold up well to a slider burger.

Since you can use any condiments/veggies you’d like on a slider burger and prep the ground burger any way you’d like, no recipe really but just some photos through his process. We had to wait for a sudden thunder-boomer to pass over to finally get this on the grill, hence some lower light photos. But it was all delicious!

Summertime Heat Grilled Slider Burgers and Fries Meal

Season and prep the burger into mini-patties, then slice up your veggies and fries. Put your veggies (we had mushrooms and onion) on a foil-made pan. Wrap King’s Hawaiian rolls in foil. Preheat your grill and if you have an outdoor burner and cast-iron skillet, turn the burner on too and preheat the oil. If not, you could use your indoor burner (at risk of heating up the house!) Put those fries on first at least 5 or so minutes before anything else as they’ll take longer.

Frying the Fries on Grill Burner

Frying the Fries on Grill Burner

Then put the burgers and veggies on the lower rack of grill, and the buns on the top rack. Monitor the burgers and veggies as needed, as well as the fries. Flip the burgers around the 5-minute mark, and stir the veggies and fries.

Burger Slider Meal on Grill

Burger Slider Meal on Grill

After you flip over the burger sliders, add any kind of cheese on top if you want. Hubby used thick chunks of Monterrey Jack cheese, but you could be more conservative on that if you want. (No, those are NOT slices of butter!)

Burger Sliders with Monterrey Jack Cheese

Burger Sliders with Monterrey Jack Cheese

When the cheese is melted and the burgers are done to your liking, remove them to a plate. Remove the warmed slider buns, too. Finish cooking the fries, if they aren’t already done, and let drain on paper towels. Dress each of your slider burgers up as desired. Aside from the onions and mushrooms, I added a light layer of mayo to each side of the bun, and a fresh tomato slice. Serve with fries.

Grilled Burger Sliders and Fries Meal

Grilled Burger Sliders and Fries Meal


Hash Brown, Ham, and Cheese Spinach Casserole ~ Light Version!

6 Mar
Hash Brown, Ham, and Spinach Casserole, Plated and Ready to Eat!

Hash Brown, Ham, and Spinach Casserole, Plated and Ready to Eat!

Now this is a yummy comfort food dish that doesn’t have to be laden with a gazillion calories if you don’t let it. This is probably one of the most common dishes brought to a potluck in the South. Most likely a funeral or some kind of “event.” I don’t say that in a bad way,  either. It’s just a dish you can bring, no matter the occasion. I’ve had so many variations of this over my lifetime, (and usually just potatoes, ham, and cheese) and to me it’s all goooood! This lightened up version is fairly easy to make aside from a little chopping and a rather abundant use of bowls. The hardest part was trying to make this flavorful without all the fat. I spent more time scouring Pinterest and the internet looking for a hash brown and ham casserole that didn’t have a “cream of” soup in it or too much  butter and cheese than I did actually preparing it. I finally settled on mashing the best parts together of several recipes, and this is what I came up with. The result? Both daughter and husband went back for huge second helpings, leaving me with a very small portion to take to work for lunch the next day. It was so small I had to make a snack run to the store later for some rice cakes to help fill in before dinner. Of course, you can double this recipe and make plenty, but I only had a half a bag of hash browns in the freezer to start. This recipe would feed four if the fam wasn’t so starving. Or perhaps they really liked it,  huh?

Hash Brown, Ham, and Spinach Casserole

Hash Brown, Ham, and Spinach Casserole ~   This is my mom’s vintage bakeware, don’t you just love it??

Hash Brown, Ham, and Spinach Casserole

12 ounces of frozen, shredded  hash browns
2 tablespoons butter, or substitute
Ground black pepper, to taste
Mrs. Dash Table Blend or salt, to taste
1/2 cup lowfat milk (I used 1%)
1/2 cup lowfat sour cream
1/2 tablespoon Dijon mustard
2 cups chopped, diced ham
1/2 cup chopped onion
1/2 cup chopped red bell pepper
1/2 cup shredded Cheddar cheese
1/2 cup shredded Monterrey Jack cheese
1 6-ounce bag spinach
Squeeze of lemon juice
1/2 cup Panko bread crumbs mixed with 1 tablespoon melted butter, or substitute
Chopped green onion parts, for garnish

Ham, Red Pepper, Cheese, and Hash Browns

Ham, Red Pepper, Cheese, Onions, and Hash Browns all ready for mixin’

Bowls! You need lots of bowls for this dish, sorry. Preheat your oven to 375 degrees and chop all your veggies and shred your cheese. Once that’s done, add the hash browns to a large bowl with the butter. Microwave for a minute or two until the hash browns are somewhat thawed and the butter is melted. Grind a bunch of black pepper over it and sprinkle Mrs. Dash or salt on to taste and mix again. In a bowl or glass measuring cup, add the milk, sour cream, and mustard and whisk to combine then stir into the hash browns. Now add all the chopped ham, veggies and cheese and combine.  Last, add the chopped spinach to another bowl, sprinkle with a little water and lemon  juice, then microwave for one to two minutes until wilted. Stir that in with the potato mixture. Now spray a small casserole dish (or large one if you doubled!) with some oil, spread the mixture evenly into the dish, then pop in oven for 45 minutes. Pull it out, sprinkle the buttered Panko bread crumbs over the casserole and put back in and bake for an additional 10 to 15 minutes until the breadcrumbs start to brown. Take out and let rest until it stops bubbling. Serve on plates with chopped green onion for garnish. This will be hot, creamy, and oh so good for your belly.

Hash Brown, Ham and Spinach Casserole 3

I just had to show you one more picture of my mother’s vintage casserole dish. I don’t cook in it that often but it’s the perfect size for this scaled-down version of the casserole. It’s probably 7 by 5 or so? Never measured it!

Spicy Sausage Skillet Pasta ~ A One-Pot Meal!

30 Jan
Spicy Sausage Skillet

Spicy Sausage Skillet

I am not at all going to pretend this is my own recipe. I saw this on Pinterest and said “Yep. I’m so doing that. Hands down.” My tweaks to this are so minor that it just stands to prove that the original recipe was a winner. It originally came from America’s Test Kitchen cookbook, and I found it on Kevin & Amanda’s food blog that I follow. Well, I don’t have the physical cookbook so searched for the link to the original recipe online, and that’s a no-can-do unless I subscribe to it for money. Gee, did I mention I’m frugal too? So instead I will linky you to the adaptation from Amanda, and then tell you about my minor tweaks. Actually some aren’t so minor (and ones you should NOT do) as I got interrupted by a phone call from my seester in Austin trying to plan a family reunion, (HI SEESTER!) and got totally distracted during the making of this. But that’s OK. I’ll try to keep to what you really need to do to make this. It really is simple if you don’t have a phone attached to your head during the process.

Spicy Sausage Skillet Hot out of Oven

Spicy Sausage Skillet Hot out of Oven

Spicy Sausage Skillet Pasta
Adapted from America’s Test Kitchen and Kevin & Amanda

1 tablespoon olive oil
1 package smoked turkey sausage, sliced 1/4-inch thick
1 1/2 cups diced onions
2 teaspoons minced garlic
2 cups homemade or low-sodium chicken broth
1 10-ounce can RoTel (or can of tomatoes and green chiles)
1/2 cup milk
8 ounces pasta, something sturdy like Penne or Rigatoni
Lots of ground pepper, to taste
6 ounces Monterey Jack cheese, shredded (about 1 1/2 cups)
2 sliced green onions

Spicy Sausage Skillet 2

A view from the other side…

Add olive oil to a cast iron or oven-safe skillet over medium high heat. Add the turkey sausage (this is the Kielbasa-looking horseshoe-shaped stuff, not the ground stuff in the casings) and onions and cook until lightly browned, about 10 minutes. The original recipe called for 4 minutes and they were not nearly done at that time. Add the minced garlic and cook about a minute more.  Add the chicken broth, RoTel tomatoes (recipe called for mild, I used original because I like spicy!), milk (recipe called for cream, did not have any), pasta, pepper and stir. Now here is where I got distracted. The recipe called for 2 cups of chicken broth, but I was yakking to my sister and I think I added 3 cups by accident. I can’t be sure. It also called for 8 ounces of pasta, but my box was 16 ounces and just eyeballed half of it while talking and think I barely added more than a quarter of the box.. oops.  Next bring the mixture to a boil, cover skillet, and reduce heat to medium-low. Simmer until pasta is tender, about 15 or 20 minutes. At this point it was way too soupy so I did what all good cooks do when this happens. I dumped the extra liquid down the drain. Worked for me! I hope you won’t have to do this step. I’m sure if I had added the correct amount of pasta (and got the broth amount right), more of the liquid would have been absorbed, too. Now remove skillet from the heat and stir in half the cheese. Top with remaining cheese and sprinkle with green onions. Broil in oven until cheese is melted and bubbly, about 5 to 10 minutes. Serve with a simple green salad on the side. The flavors are just delicious and creamy gooey and you will gobble this right up!